
via
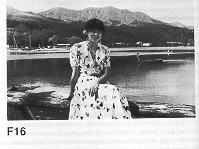
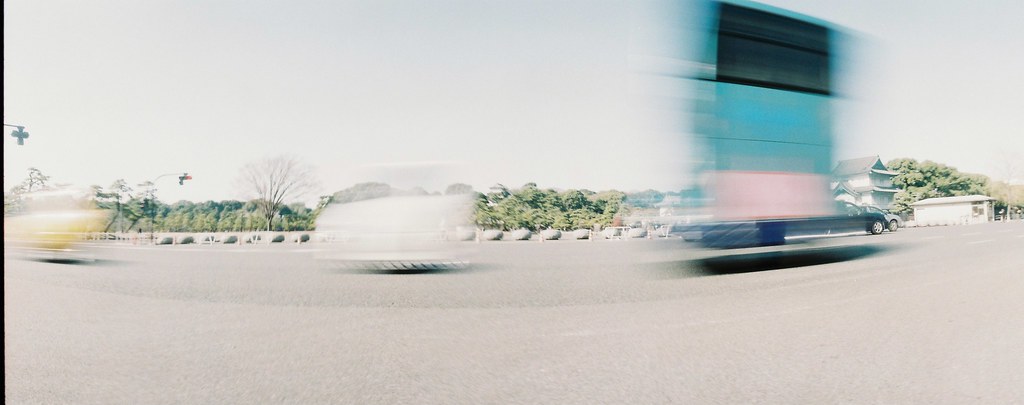
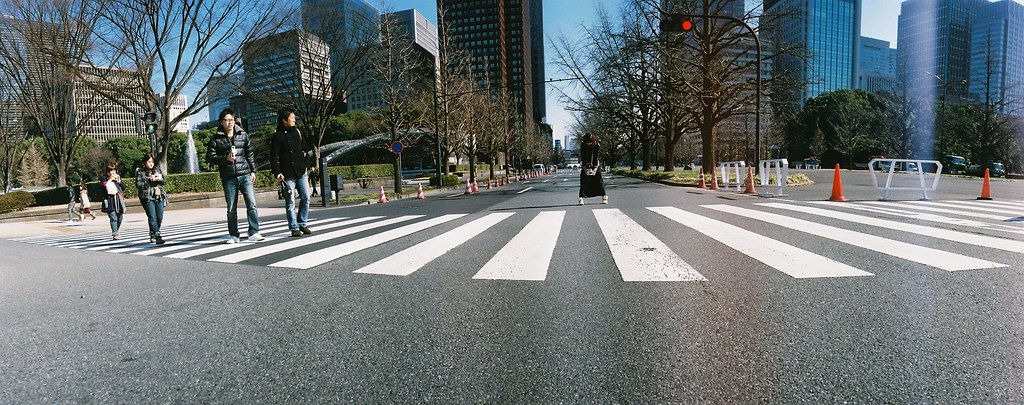
 The Horizon 202 Panoramic Camera is a swing-lens panoramic camera that takes in a 120-degree field of view with its sharp, well-corrected 28mm f/2.8 lens. It uses standard 35mm film and produces twenty-three 24x58mm images on a 36-exposure roll. Low and High panning speeds plus three focal plane slit widths provide exposure times of 1/2, 1/4 and 1/8 second (Low), and 1/60, 1/125 and 1/250 second (High).
 A built-in optical viewfinder shows a 110-degree field of view, as well as a reflected image of the top-mounted horizontal bubble level (which is also visible from the top of the body).
Horizon 202 panoramic camera Kit
The basic Horizon 202 camera kit includes:
| Lens: | MC Arsat 2.8/28 |
| Picture format, mm: | 24x58 |
| Focusing sacle: | from 0.5 m to infinity |
| Aperture scale: | f2.8 to f16 |
| Shutter speeds, s: | 1/2, 1/4, 1/8, 1/60, 1/125, 1/250 |
| Finder: | Wide-angle viewfinder with viewable bubble level |
| Tripod screw mount: | 1/4-inch |
| Number of frames: | 22 |
| Panning angle, degree: | 120 |
| Film used: | 35mm perforated |
| Film length in a cassette, m: | 1.65 |
| Dimensions, mm: | 117.5x146x73 |
| Weight, kg: | 0.82 |
Advantages of the Horizon 202 panoramic camera:


Super Slick Dusky Lighting Effects in Photoshop
Turn a regular sunset photo into something special with this effect.

Vintage Clouds
An ordinary sky becomes a much more dramatic scene in this tutorial.

Add a Realistic Rainbow to a Photo
Sometimes you may want to add a rainbow when there simply isn’t one in the photo.

Basic Graduated Neutral Density Filter
A subtle yet powerful effect for skies in photos.

Add Dynamic Lighting to a Flat Photograph
The sky in your photos can be drastically improved with Photoshop to create a more striking image.

The Orange Sky
This tutorial takes an image of the skyline as the starting point and gives it more character.

The Magic Night
This tutorial uses several different images to create this sky and the reflection on the water.

Warm Golden Sunsets with Gradient Maps
Turn an unspectacular sunset picture into something more special.

Clouds from Above
Clouds can be used for a lot of different types of work.

This tutorial takes an image of a planet and implements it into a landscape photo.

Create a Starry Sky in Photoshop
Adding some stars to a sky is a practical trick that could easily come in handy.

Realistic Fog and Mist
Create realistic fog in just a few steps.

Quick Sunsets
Take a photo shot during the day and give it a sunset effect.

The Soft Sea Light
Create a planet on the horizon of the sea.

How to Break Sunlight Through the Clouds
When working with images of the sky, adding a sunlight or ray effect can create a completely different look.

The White Tree
Create a more interesting and dramatic sky in the background of a photo.

Mysterious Lightning
This tutorial uses a few different photos to create the scene and some Photoshop touches for the lightning.

Thank you for purchasing of this camera. This auto exposure single-lens-reflex (SLR) camera offers you many sophisticated features such as two types of programmed auto exposure, aperture-priority auto exposure, fast 1/2000 second shutter and automatic film advance.
Please study this manual thoroughly before using so as to ensure proper operation and years of trouble-free use.
The manual is illustrated with reference to the YASHICA ML 50mm f1.9c lens.
If you use other interchangeable YASHICA or CARL ZEISS lenses on this camera, they are also applicable and can be used in the same manner as described in this manual.
| NAME OF PARTS ....................... 6 BASIC PROCEDURES | Aperture-priority Auto Exposure .... 40 |
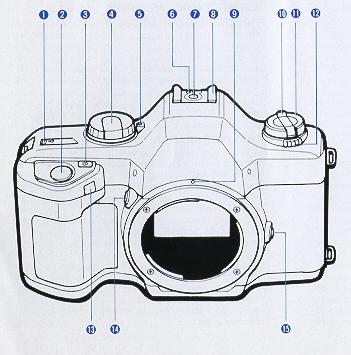 | 1. Exposure Counter |
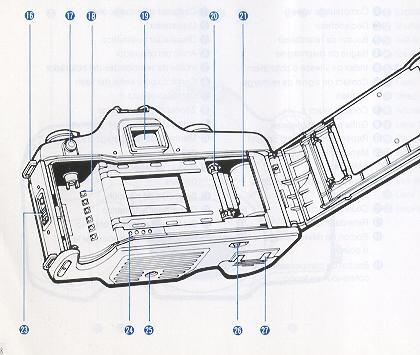 | 16. Strap Lug |
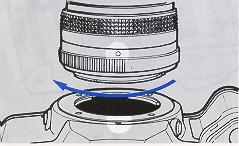
Lens Changing
|
|
|
< Mounting the lens > First, remove the camera body-cap and lens rear-cap by turning them counterclockwise. Then align the red dot on the lens with the Lens Mounting Index on the Mount of the camera body, gripping the lens barrel firmly and turn the lens clockwise until it locks with a click.
· Using a lens cap of snap-on type, attach or remove it from the lens by pressing the two side-tabs.
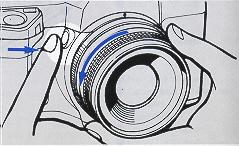
< Dismounting the lens > While pressing the lens release button, turn the lens counterclockwise as far as it will go, gently remove it from the camera body-mount Replace caps on the camera body and the lens mount to protect them.
* When mounting and dismounting the lens, avoid touching the lens , surface and the interior of the body
* Avoid direct sunlight when changing the lens with film loaded in the camera.4www.butkus.org
Batteries Loading
|
|
|
This camera is battery powered to perform all necessary functions, including film winding, shutter and display in the viewfinder. Therefore, make sure that batteries are installed correctly before using the camera. It will not operate without batteries
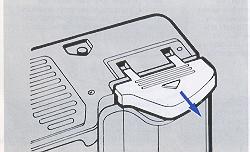
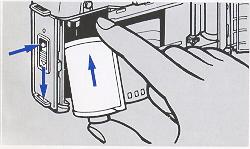
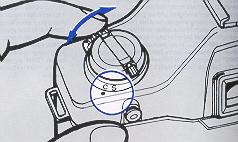
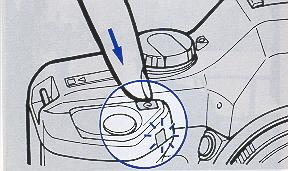
1. Open the Battery Compartment Cover by pushing it in the direction of arrow.
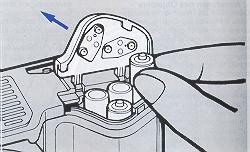
2 Insert four alkaline AAA-size batteries as indicated by the battery label inside the battery compartment following the "+" and "" - "" sign illustration.
· Do not force in the batteries. Let them drop-in the battery compartment.
· The batteries packed with the camera are supplied as tester. It can be used only for testing all available camera functions.
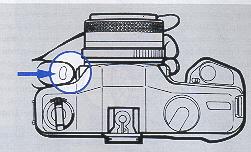
Turning ON and OFF the Camera
 | The power switch of the camera is turned on and off by means of the Shutter Dial. If you set the Shutter Dial at any position other than "OFF", it will turn on the power switch of the camera. If you are not taking pictures, set the Shutter Dial at "OFF" to prevent the shutter from tripping accidentally and save the battery power. |
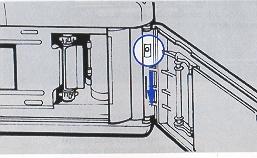
Film Loading
|
|
|
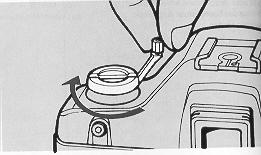
Set the Shutter Control Dial to any position other than "OFF", open the Camera Back and load the film. Open the Camera Back by pushing down the Camera Back Lock while pressing in the button on it. To insert the film, first fit the recess of cassette to the shaft on the top of the film chamber and push in the film cassette smoothly.4www.butkus.org
· Always load and unload film in subdued light.
· Use DX-coded film. If non DX-coded film is used, the camera will set its film speed to ISO 100 automatically.
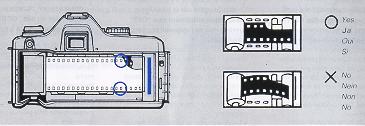 | 2. Insert the film leader under the orange mark "" -- "" and close the Camera Back. Engage the film perforations with the teeth on sprocket and insert the leader of film in the slot under the orange mark "" -- "" at the end of the film channel. Make sure the film lies flat on the film channel as shown. |
· If the leader of the film is too long, adjust its length by rewinding it back into the film cassette.
3. Slightly depress the Shutter Release and the film will automatically advance to the first frame. If you depress the Shutter Release, the film will automatically advance and the Exposure Counter will switch from "S" to "1". After the film has advanced, take up the film slack by erecting the Film Rewind Crank, follow the direction of arrow and turn it gently as far as it will go. Reset the Film Rewind Crank to the original position after taking up the film slack. The camera is ready to take pictures. If the Film Rewind Knob turns after you have depressed the Shutter Release, the film is advancing properly.
<>
 | The exposure counter advances every time the automatic winding mechanism operates, and returns to "S" (Start) when the camera back is opened, regardless of whether or not there is film in the camera. The exposure counter starts with "S", then "1", followed by even numbers from "4" through "36". The odd numbers are indicated by dots marked between the even numbers. The orange-colored numbers "12", "24" and "36" correspond to the number of exposures in standard 35mm film cartridges.4www.butkus.org |
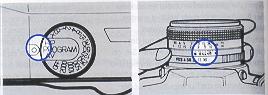
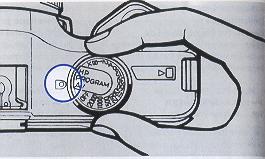
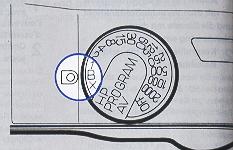
The Shutter Dial is used as the power switch of camera, it is also used for seeing auto exposure modes and shutter speeds in case of manual exposure. Turn and set the dial to your desired exposure position.
< Shutter Dial Setting >
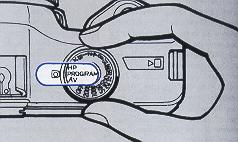 | "PROGRAM" - standard programmed auto exposure The camera will automatically select the correct combination of shutter speed and aperture from its program according to the brightness of the subject. "HP" High-speed Programmed auto exposure This mode will give a priority to a fast shutter speed for providing correct exposure. This mode is useful for shooting quick sports scenes or sharp portraits against a blurred background. It is also good for avoiding camera shake when taking pictures with a telephoto lens. |
"AV" Aperture-priority auto exposure If you set your camera at the desired aperture, the camera will automatically control the shutter speed according to the brightness of the subject to provide correct exposure. This mode is suited for shooting with lens with depth-of-field emphasis.
"2000,1000 - 2, 1"
"In the manual exposure mode, choose your desired shutter speed on this dial. "2000" means 1/2000 second, "1000" means 1/1000 second, , and "1" means 1 second.
"B" Bulb
As long as the Shutter Release is held depressed, the shutter will remain open to expose the film.
"X" Flash synchronizing speed Set the Shutter Dial to "X" it pictures are taken with flash units other than dedicated flash (CS-140 FLASH or CS-220 AUTO FLASH). The synchro socket of the camera is a direct "X contact" type and the shutter will trip at 1/90 sec. "OFF" Camera OFF The power switch of the camera is turned off.
* Intermediate setting are not available on the Shutter Dial index. Do not set in-between positions.
<>
 | With the Drive Selector, you can set the film drive mode at either "S" (Single) or "C" (Continuous). Switch it to suit your purpose. "S" Each time the Shutter Release is depressed, the shutter trips to expose one frame, then the film will advance to the next frame, before it will stop. "C" As long as the Shutter Release is held depressed, the shutter will trip in succession to take pictures one after another. If you take your finger off the Shutter Release, then the film will advance to the next frame, before it will stop.4www.butkus.org |
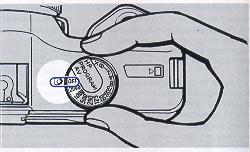
Holding the Camera
To take sharp picture, it is important to hold the camera still. Because the main cause of blurred pictures is camera shake, it is recommended to learn how to hold the camera and find the best position that suits you. Place the camera in the palm of your left hand, hold the len's focusing ring so that you can turn it with your fingers; grip the camera with your right hand and put the forefinger lightly on the Shutter Release. Stick the left elbow to your body, press the camera lightly against your face and look through the viewfinder. Always depress the Shutter Release slowly and gently. To accommodate objects of different shapes, the camera can be used both in the horizontal and in the vertical position. In either case, choose the position that suits you best. Sometimes you could gain stability and support by leaning against a building or tree when pictures are taken.
Display In the Viewfinder
 | If the Shutter Release is lightly depressed when the camera switch is on, the relevant display in the viewfinder will light up or blink for about 8 seconds showing the following shooting information's.
|
" ![]() " Lights up: When the Shutter Dial is set to an auto exposure mode ("HP", "PROGRAM ", or "AV").
" Lights up: When the Shutter Dial is set to an auto exposure mode ("HP", "PROGRAM ", or "AV").
" ![]() " Blink: When the control range of the program is narrow. The lens cannot be adjusted down to the "HP" or "PROGRAM" mode. In this case, adjust it to its minimum aperture (or the largest f-number).
" Blink: When the control range of the program is narrow. The lens cannot be adjusted down to the "HP" or "PROGRAM" mode. In this case, adjust it to its minimum aperture (or the largest f-number).
"![]() " Lights up: When the exposure is correct in the manual exposure mode.
" Lights up: When the exposure is correct in the manual exposure mode.
"![]() "Blinks: When the Shutter Dial is set to "B" (Bulb).
"Blinks: When the Shutter Dial is set to "B" (Bulb).
"![]() " or "
" or "![]() " Lights up: In manual exposure, when the exposure is over " "
" Lights up: In manual exposure, when the exposure is over " "![]() " " or under "
" " or under "![]() " within 1 EV relative to the correct exposure.
" within 1 EV relative to the correct exposure.
"![]() " " or "
" " or " ![]() "' Blinks: In manual exposure, when the exposure is over "
"' Blinks: In manual exposure, when the exposure is over " ![]() " or under "
" or under " ![]() " by more than 1 EV relative to the correct exposure. In aperture-priority auto exposure (AV), when the set aperture is not within the camera exposure control range.
" by more than 1 EV relative to the correct exposure. In aperture-priority auto exposure (AV), when the set aperture is not within the camera exposure control range.
"![]() " Lights up: When it is fully charged on a dedicated flash (CS-140 FLASH or CS-220 AUTO FLASH).
" Lights up: When it is fully charged on a dedicated flash (CS-140 FLASH or CS-220 AUTO FLASH).
" ![]() " Blinks: When the shutter speed is slower than 1/30 second in an auto exposure mode, this sign is to warn you of a risk of camera shake In this case, use a flash unit or support the camera with a tripod.
" Blinks: When the shutter speed is slower than 1/30 second in an auto exposure mode, this sign is to warn you of a risk of camera shake In this case, use a flash unit or support the camera with a tripod.
Focusing
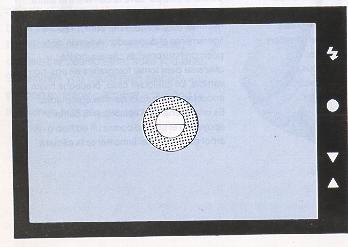
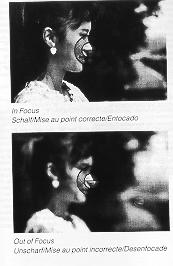 | Focusing is done with the split image in the center of the viewfinder, the microprism collar around it, or the surrounding matte screen.
|
<> Turn the focusing ring until the image on the microprism or mane screen appears sharpest. If the subject is not in sharp focus, the image on the matte screen unsharp.
·If you are using a "slow" lens or taking close-up with a high magnification, you may not be able to focus properly. In such case, focus with the surrounding mane screen.
·If you are far-sighted or near-sighted, use an optional FL type diopter lens. There are eight types available, (-5, -4, -3, -2, O. +1, +2 and +3), which can be attached to the Viewfinder Eyepiece.
Rewinding the Film
|
|
|
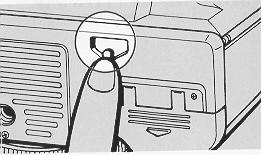
After the entire roll of film has been exposed, the shutter will no longer trip. Sometimes the Reflex-mirror inside the body may stop halfway up. Make sure the end of the film is reached on the camera.
1. Press in the Film Rewind Button on the bottom of the camera.
· It is not necessary to hold the button down. 2. Turn off the battery power of the camera. Erect the Film Rewind Crank and turn it in the direction of the arrow to rewind the film.
You will feel a slight tension when the film is released from the spool. After making sure the tension has been released by turning the crank a bit more, open the camera back and unload the film.
· If the Reflex-mirror inside the camera stays in the halfway up, reset it with the Shutter Release.
Do not depress the Shutter Release while the film is being rewound. Take the exposed film for processing as soon as possible.
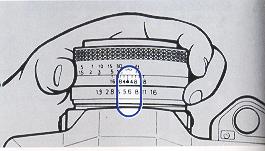
Programmed Auto Exposure
|
| Set the Shutter Dial to either "PROGRAM" or "HP". If you depress the shutter Release lightly, a green lamp " |
 | 2. Set me lens aperture to minimum (the largest f-number) If the green lamp in the viewfinder blinks, it means the lens is not stopped down to its minimum aperture. Adjust until the lamp stops blinking. 3. Focus the lens and compose your picture Focus the lens by turning it distance ring, compose your picture and shoot.4www.butkus.org |
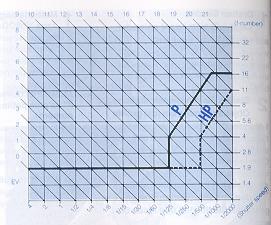 | The following diagram shows the combinations of shutter speed and aperture in the standard program and high-speed program auto exposure modes. P - Standard PROGRAM HP - High-speed Program |
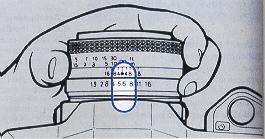
Aperture-priority Auto Exposure
|
|
|
1. Set the Shutter Dial to "AV" If you depress the shutter Release lightly, a green lamp e will appear in the viewfinder indicating that the camera is set up for auto exposure.
2. Choose the aperture Set to the desired aperture by turning the aperture ring.
3. Focus the lens and compose your picture Focus the lens by turning its focusing ring, compose your picture and shoot. ![]() " / Under "
" / Under "![]() " exposure Warning in Aperture-priority Auto Exposure> When the Shutter Release is lightly depressed, the lamp " "***" " or "***" means that the aperture value selected is respectively on the overexposure or underexposure side beyond the exposure, adjust the aperture unit the lamp no longer blinks.
" exposure Warning in Aperture-priority Auto Exposure> When the Shutter Release is lightly depressed, the lamp " "***" " or "***" means that the aperture value selected is respectively on the overexposure or underexposure side beyond the exposure, adjust the aperture unit the lamp no longer blinks.
Manual Exposure
|
|
|
1. Set the shutter speed the Shutter Dial and the aperture With the aperture ring
2. Check correct exposure If you depress the Shutter Release lightly, the lamp "![]() " or/ and "
" or/ and " ![]() " will light up or blink (see illustration below) to indicate exposure condition at that time. Adjust your shutter speed and aperture so as to obtain correct exposure. 4www.butkus.org
" will light up or blink (see illustration below) to indicate exposure condition at that time. Adjust your shutter speed and aperture so as to obtain correct exposure. 4www.butkus.org
![]() - Blinks Overexposure of more than 1 EV.
- Blinks Overexposure of more than 1 EV. ![]() Lights up Overexposure within 1 EV.
Lights up Overexposure within 1 EV.
![]() Lights up Correct exposure.
Lights up Correct exposure.
![]() Lights up - Underexposure within 1 EV.
Lights up - Underexposure within 1 EV.
![]() Blinks Underexposure of more than 1 EV.
Blinks Underexposure of more than 1 EV.
3. Focus the lens and compose your picture Focus the lens by turning its focusing ring, compose your picture and shoot.
Bulb Exposure
 | To take night scenes or pictures of the sky at night requiring long exposure time, set the Shutter Dial at "B" (Bulb). Then, as long as the Shutter Release is depressed, the shutter remains open to allow long exposure time on the film. To avoid blurred pictures, mount the camera on a tripod or put it on a stable base and trip the shutter with a Cable Switch (optional accessory). |
* When the Shutter Dial is set at "B" the lamp "![]() " will blink in the viewfinder by depress) the Shutter Release
" will blink in the viewfinder by depress) the Shutter Release
Backlight Compensation Button
 | If you are shooting in an auto exposure mode ("HP", "PROGRAM", or "AV") and your subject is black-lighted or situates in front of a bright window, it will be underexposed and appears dark in the picture. In this case, trip the shutter while pressing in the Exposure Compensation Button. Your subject will be exposed with an exposure compensation of +1.5 EV. |

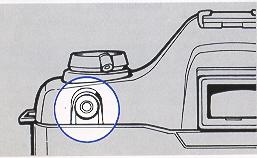
Self-timer
 | If you want to include yourself in a group picture or a souvenir picture, use the self-timer. 1. Focus the lens on the subject and compose your picture. 2. Depress the Self-timer Button. The Self-timer LED will turn on and the shutter will automatically trip in about 10 seconds. The Self-timer LED will light up for the first 8 seconds, then will blink for the remaining 2 seconds to warn you right before tripped of the shutter.4www.butkus.org |
· To stop the self-timer after it has been activated, simply press the Self-timer Button once again.
· If you depress the Shutter Release while the self-timer is running, the shutter will trip immediately.
· Under strong daylight, if you start the self-timer without putting your eye on the Viewfinder Eyepiece, it is advisable to cover the eyepiece with the Eyepiece Cover. However, you need not attach the Eyepiece Cover in manual mode.
Flash Photography
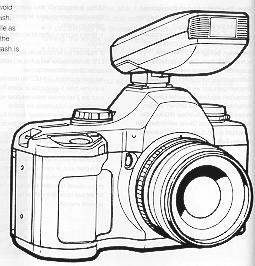 | If the lamp " If you use any of these flash units, the lamp " |
Depth-of-field
|
|
|
When the lens is focused on a subject, not the subject itself, but also a certain zone in front and behind of it will appear as acceptably well focused. This range is called the depth-of-field of a lens and it changes in following ways:
1. The smaller the aperture, the deeper the depth-of-field, and vice versa.
2. The longer the subject distance, the deeper the depth-of field, and vice versa.
3. The zone of sharpness behind the point on which the lens is focused is larger than that in front of it. Also the shorter the focal length, the wider the range of depth-of-field, and vice versa.
Certain zoom lenses are not provided with a depth-of-field
Infra-red' Compensation Mark
To take infra-red pictures with B & W infra-red film (by using an infra-red filter), compensation on focusing is necessary. The point of focus will shift slightly relative to that in normal photography. For this purpose, an infra-red compensation mark is provided on the depth-of-f ield as normal, then put on the filter, shift that distance to the infra-red mark and shoot.
· If you use color infra-red film, follow the instruction sheet in the film package.4www.butkus.org
Release Socket/interchangeable Camera Back
|
|
|
Attaching the Accessories
Battery Check
The lamps "![]() ", or "
", or "![]() " and "
" and "![]() " in the viewfinder are also used as battery checking indicators. If the battery voltage is nominal, the lamps will light up steadily or blink at a constant frequency (6 times per second). If the battery voltage is low, the lamp will no longer light up steadily or it will blink with irregular interruption. In this case, the batteries still have enough power for exposing the film remaining in the camera, but you will have to change them after exposing the entire roll of film. If the battery voltage falls below the specified level, all lamps in the viewfinder will blink and you cannot trip the shutter. Replace all batteries immediately with new ones (four AAA size Alkaline batteries).
" in the viewfinder are also used as battery checking indicators. If the battery voltage is nominal, the lamps will light up steadily or blink at a constant frequency (6 times per second). If the battery voltage is low, the lamp will no longer light up steadily or it will blink with irregular interruption. In this case, the batteries still have enough power for exposing the film remaining in the camera, but you will have to change them after exposing the entire roll of film. If the battery voltage falls below the specified level, all lamps in the viewfinder will blink and you cannot trip the shutter. Replace all batteries immediately with new ones (four AAA size Alkaline batteries).
· Fast blinking - aperture warning
· Slowing blinking - batteries warning
Battery Precautions
· Always replace all four batteries at the same time with new ones of the same type and brand. Never mix new and old ones.
· Battery performance would be reduced in extreme low temperatures (i.e. 0°C or below). If you are shooting in extreme cold weather, use new batteries and keep the camera warm before shooting. Even if batteries performance is reduced temporarily in low temperatures, it will recover once room temperature is resumed.
· Wipe both caps of battery cell clean with a piece of dry cloth before use. Batteries soiled by sweat, oil or grease will cause poor contact and malfunction.
· If you are going on a long trip, bring spare fresh batteries along with you.
· Do not throw used batteries into a fire or attempted to take then apart because it is dangerous.
· To take full advantage of the outstanding features of this camera, we recommended you to use our interchangeable lenses and accessories designed for it.4www.butkus.org
· We are not responsible for the malfunctions and trouble resulting from the use of products by other makers. It is advisable to use our interchangeable products.
Camera Care/Camera Storage
· Do not expose the camera to extreme temperatures (e.g. on a beach in summer or in a parked car under direct sunlight, etc ) for a prolonged period of time. The camera, film and batteries may be adversely affected.
· After taking picture at the seaside or on mountains, clean the camera thoroughly. Salty air would cause corrosion, sand and dust would adversely affect the internal precision parts of the camera.
· To remove dust and dirt on the lens and viewfinder eyepiece, use an air blower or a soft lens brush. Wipe off fingerprints lightly with lens tissue. Remove dust and soil on the mirror surface with a lens brush.
· The lens and viewfinder glass may be clouded if the camera is carried into a warm room from outdoors where it is cold. Cloudiness caused by condensation disappears quickly. But, it is recommended to avoid sudden changes internal corrosion.
· If you are going to use the camera for important events such as an overseas trip or wedding ceremony, test it before hand to make sure it functions properly. It is also advisable to bring spare batteries along with you.
Specifications
TYPE: 35mm auto-exposure Single-Lens-Reflex (SLR) camera with focal-plane shutter.
Picture: 24 x 36 mm
Lens Mount: YASHICA / CONTAX mount.
Shutter: Vertical-travel metal focal-plane shutter.
Shutter Speed: 1/2000 -1 6 SEC. on auto, 1/2000 -1 SEC. (1 2 steps) on manual, X (X-contact) and B (Bulb).
Shutter Release: Electromagnetic release, provided with dedicated cable release socket.
Exposure control: (1) Standard programmed auto exposure, (2) High-speed Programmed auto exposure, (3) Aperture priority auto exposure, (4) manual exposure, (5) manual flash exposure.
Metering System: TTL center-weight light metering at full aperture. SPD (Silicon Photo Diode) cell.
Metering Range: EV2 - EV19 (ISO 100, f/1.4 lens)
Film Speed Setting: Automatic setting with ISO 25 - 3200 DX coded films, film speed is automatically set to ISO 100 for non DX-code films.
Viewfinder: Penta-prism eye-level finder, 92% field-of-view, 0.82X magnification (with 50mm normal lens at infinity).
Focusing Screen: Horizontal split-image and microprism collar.
Display in viewfinder: Four LED lamps (***, O. *** *** )
Film Winding: Automatic film winding with built-in motor, auto loading and automatic film advance to frame No. "1", continuous (C) shooting with drive selector.
Film Rewinding: Film Rewind Button and Rewind Crank.
Exposure Counter: Automatic reset, additive type.
Accessory Shoe: Direct X-contact hot-shoe (provided with flash coupling contacts).
Synchro Socket: X-contact only, shutter speed automatically switches to 1/90 sec. synchronizing with dedicated flash when it is fully charges, or slower speed in manual exposure. " " *** " " lamp lights up when flash if fully charges.
Self-timer: Electronic Quartz-timer with 10 seconds delay on shutter release with self-timer LED turns on while self-timer is operating. Cancelable during count-down.
Exposure Compensation: + 1.5 EV exposure compensation is possible with exposure compensation button.
Camera Back: Detachable camera back. Open by release knob, provided with Film Check Window.
Power Source: Alkaline batteries (1 .5v x 4 pcs. of MA-size). 4www.butkus.org
Battery Capacity: About 50 rolls of 24-exposure film with AAA size Alkaline batteries. (According to the factory testing conditions and standards of YASHICA.)
Dimensions: 149 (W) x 93 (H) x 52 (D) mm [5-7/8(W) x3- 11/16(H) x2- 1/16(D) in.]
Weight: 5009 (Body only without lens, film & batteries.) [1.1 lb.]
· Specifications and design are subject to change without notice.