Preparing For This Tutorial:
You will be using a picture of this town. If you do not have this image, please scroll down to the image of “Click Picture To Download Supporting Files” and download the image. Please open the image PE-MIN in the Photoshop Program.
Finding The Right Picture:
Have you ever looked at a miniature model? If so, you will find that most of the time you are viewing the model by looking down at it. You will also see that the light source is coming from above. With that said, some photos are easier to fool the eyes into thinking that it is a miniature model. Usually a picture that was taken above the objects and the light source is also coming from above will easily fool the person into thinking that it is a miniature model.
The technical term for fooling the eyes is tilt shift. You can buy tilt shift lens for your camera or you can do post processing in Photoshop.
Photoshop Education Steps:
The way we tilt shift is not new and if you search for tutorials you will find many different ways to blur everything, except a small portion of the image. This tutorial is considered for beginners and you will find that there are more advanced tutorials on the Internet that expands on your knowledge, but the basic tilt shifting is done the same way.
Tilt Shift:
Once you have the image opened in Photoshop, duplicate the background layer (CTRL-“J”). For this document, we renamed the top layer “Tilt Shift”.
Left click the layer mask button in the layers palette.

The layers palette should now look like this. 
Reset your foreground/background colors with the keyboard shortcut “D”. Now let’s flip the black to the foreground with the “X” key on the keyboard.
Left click the Gradient tool in a 2 column toolbox. Feel free to read the Gradient And Paint Bucket Tools or More Gradients Please tutorials, which explains how to use the Gradient tool.

In the Gradient options bar, please set the following settings.
| A). Make sure the preset is set to foreground to transparency. | |
| B). Left click the “Reflected Gradient” option. |

This next step is trial and error. It is extremely important to get this step right. Don’t worry if it is not exactly perfect, because we will show you a way to correct any blurring issues.
Start by moving the mouse pointer a little below the peak of the house. HOLD down the “Shift” key on the keyboard to draw a straight line. Hold down the Left mouse button and drag the pointer to the roof line (see red arrow below). Release the Left mouse button and the “Shift” key on the keyboard.

You may be thinking, “But it did not do anything”. Don’t worry, the next step will show you that you actually created a nice layer mask. Notice the darker area of the layer mask in the layers palette.

Now Left click on the image of the “Tilt Shift” layer. When selected, you will see a square box will be around the thumbnail in the layers palette.

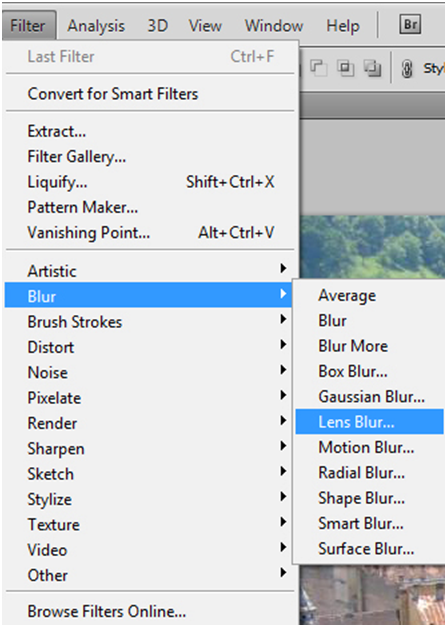
It’s time to blur the image. Left click the “Filter” menu and move the mouse pointer to the “Blur” menu. From the sub-menu Left click the “Lens Blur…” command.
Photoshop Tip – If you do not see the “Lens Blur…” command, than that means you are using an older version of Photoshop. Try “Gaussian Blur..” if you are using an older version.

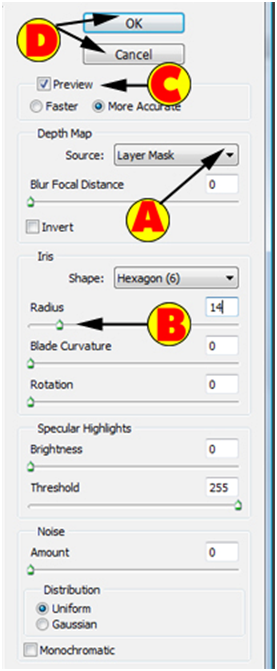
Here are the basic settings for the Lens Blur filter.
| A). Left click the down arrow and Left click the “Layer Mask” source. | |
| B). Play with the Radius setting to get the correct Lens Blur amount. 14 for this one. | |
| C). Make sure the Preview option is checked. | |
| D). Left click the “OK” button to apply the changes or Left click “Cancel”. |

This image is tougher to blur, because usually you do not want certain objects to be partially blurred. Here is our current picture.

It is time to correct the blurred areas of the image. Determine which objects should be completely focused and hide the blur with the layer mask. In the layers palette, Left click the layer mask.

Change the tool to the paint brush and make sure your foreground color is black. Back in the Masking And Transform Information or More Masks Please tutorials, we explained to you about the difference between a black and white color. You can change the brush size by using the “[“ (to decrease) and “]” to increase. Begin to paint over the buildings and areas that you want to no longer be blurred. You should not have objects that are partially blurred.
If you need to blur an area, use the “X” key on the keyboard to flip the foreground and background colors around. Here is our current image.

Left click on the thumbnail of the layer image for the background layer in the layers palette. Most miniature models look plastic. An easy way to make the object look more plastic is by increasing the saturation. Use CTRL-“U” to be taken to the Hue/Saturation screen. For more information about this adjustment, please read the Hue And Saturation Adjustment tutorial.
For the “Master” setting, change the “Saturation” value to +19. DO NOT Left click “OK” yet.

Change the selection to “Reds” and change the Saturation value to +19. Left click the “OK” button to apply the changes.

Here is our final image for this specific tutorial. There are a few more techniques beyond this tutorial that could make your miniature model look even better, but for now you have the basic understanding of how to create a tilt shift effect in Photoshop.

Conclusion:
You have just learned a basic technique to fool the eyes into thinking that the picture was taken of a miniature model. We explained that images that are taken from above are easier to fool a person with because usually when you are viewing a real miniature model, you are viewing it from above. By using the tools that you already know (layer mask, gradient, paint brush, and hue/saturation, this tutorial should have been very easy to follow.

0 commenti:
Posta un commento